LAMP là gì ?
LAMP là chữ viết tắt thường được dùng để chỉ sự sử dụng các phần mềm Linux, Apache, MySQL/MariaDB và PHP/PHP-FPM để tạo nên một môi trường máy chủ Web giúp triển khai các website trên môi trường Internet.
Bài viết dưới đây sẽ hướng dẫn các bạn cài đặt LEMP trên Centos 7 :
Cài đặt LAMP trên Centos 7
1. Bước 1: Cài đặt Apache và cấu hình cơ bản
1.1. Tắt Selinux
Để tắt Selinux các bạn chạy lệnh sau
sed -i 's/SELINUX=enforcing/SELINUX=disabled/g' /etc/selinux/config && setenforce 0
1.2. Cài đặt Apache
Để cài đặt Apache trên centOS các bạn chạy các lệnh sau
yum -y install epel-release
yum -y update
yum -y install httpd
Nếu bạn sử dụng Firewalld thì bạn sẽ cần mở port để có thể truy cập website
firewall-cmd --add-service=http --permanent
firewall-cmd --add-service=https --permanent
firewall-cmd --reload
1.3. Cấu hình Apache cơ bản
Để thuận tiện cho việc chỉnh sửa file các bạn có thể kết nối tới VPS thông qua SFTP theo hướng dẫn sau
Để cấu hình Apache các bạn mở file /etc/httpd/conf/httpd.conf

Dưới đây là các thông số cần sửa
#ServerName www.example.com:80
DirectoryIndex index.html
Các bạn sửa lại thành như sau
ServerName www.example.com:80
DirectoryIndex index.html index.htm index.php
Thay www.example.com bằng tên miền bất kỳ. Tiếp theo các bạn thêm 2 rules sau phía dưới dòng Listen 80
ServerTokens Prod
KeepAlive On
ServerSignature Off

1.4. Bật Userdir
Mặc định thư mục chứa code sẽ nằm trong /var/www/html, với chức năng userdir cho phép di chuyển thư mục chứa code sang vị trí khác đồng thời dễ dàng quản lý vhost theo từng user.
Để bật Userdir các bạn mở file /etc/httpd/conf.d/userdir.conf. Tại đây các bạn cần sửa các rules sau
UserDir disabled
#UserDir public_html
Sửa lại thành như sau
#UserDir disabled
UserDir public_html

Tiếp theo các bạn tìm đoạn rule sau
<Directory "/home/*/public_html">
    AllowOverride FileInfo AuthConfig Limit Indexes
    Options MultiViews Indexes SymLinksIfOwnerMatch IncludesNoExec
    Require method GET POST OPTIONS
</Directory>
Sửa nó lại thành như sau
<Directory "/home/*/public_html">
    AllowOverride All
    Options None
    Require method GET POST OPTIONS
</Directory>

1.5. Chặn truy cập IP VPS tự động redirect về website trên VPS
Theo mặc định thì khi truy cập IP của VPS hoặc khi trỏ một tên miền về VPS mà tên miền này không được cấu hình vhost thì bạn sẽ được redirect tới một website bất kỳ trên VPS, điều này là không nên và để hạn chế điều này các bạn mở file /etc/httpd/conf/httpd.conf và thêm phía trên dòng IncludeOptional conf.d/*.conf rules sau:
<VirtualHost *:80>
	DocumentRoot /var/www/html
	ServerName www.example.com
	<Directory "/var/www/html">
		AllowOverride All
                Options None
                Require method GET POST OPTIONS
	</Directory>
</VirtualHost>
www.example.com cấu hình giống ServerName trong file httpd.conf

1.6. Tạo virtual host (vhost) cho website
Virtual Host là file cấu hình trong Apache để cho phép nhiều domain cùng chạy trên một máy chủ. Có một khái niệm khác được đề cập tới trong Nginx cũng có chức năng tương tự như Virtual Host được gọi là Server Block.
Tất cả các file vhost sẽ nằm trong thư mục /etc/httpd/conf.d/. Để tiện quản lý mỗi website nên có một vhost riêng, ví dụ: tenten.vn.conf
Trong ví dụ này sẽ tạo website hostvn.net với vhost tương ứng là /etc/httpd/conf.d/tenten.vn.conf với nội dung sau:
<VirtualHost *:80>
	ServerName www.tenten.vn
	ServerAlias tenten.vn
	DocumentRoot /home/tenten.vn/public_html
	ErrorLog /home/tenten.vn/logs/error_log
	CustomLog /home/tenten.vn/logs/access_log combined
</VirtualHost>
Tiếp theo các bạn cần tạo thư mục chứa mã nguồn website và thư mục chứa file log bằng các lệnh sau
mkdir -p /home/tenten.vn/public_html
mkdir -p /home/tenten.vn/logs
chown -R apache:apache /home/tenten.vn
1.7. Khởi động Apache
Tiếp theo các bạn cần tiến hành khởi động Apache bằng cách chạy 2 lệnh sau
systemctl start httpd
systemctl enable httpd
1.8. Kiểm tra
Sau khi cấu hình hoàn tất các bạn trỏ tên miền về vps sau đó tạo file /home/tenten.vn/public_html/index.html và gõ tên miền của bạn vào thanh địa chỉ của trình duyệt để kiểm tra
2. Bước 2: Cài đặt MariaDB
MariaDB là một sản phẩm mã nguồn mở tách ra từ mã mở do cộng đồng phát triển của hệ quản trị cơ sở dữ liệu quan hệ MySQL nhằm theo hướng không phải trả phí với GNU GPL. MariaDB được phát triển với sự dẫn dắt của những nhà phát triển ban đầu của MySQL, do lo ngại khi MySQL bị Oracle Corporation mua lại.
MariaDB được định hướng để duy trì khả năng tương thích cao với MySQL, để đảm bảo khả năng hỗ trợ về thư viện đồng thời kết hợp một cách tốt nhất với các API và câu lệnh của MySQL.
Trong hướng dẫn này TENTEN sẽ hướng dẫn các bạn cài đặt MariaDB thay vì Mysql. Theo mặc định repo của CentOS chỉ có sẵn MariaDB 5. Để cài đặt MariaDB 10 các bạn cần tạo repo riêng.
2.1. Tạo repo cài đặt MariaDB 10
Các bạn tạo file /etc/yum.repos.d/mariadb.repo với nội dung sau
[mariadb]
name = MariaDB
baseurl = http://yum.mariadb.org/10.7.1/rhel7-amd64/
gpgkey=https://yum.mariadb.org/RPM-GPG-KEY-MariaDB
gpgcheck=1
- Lưu ý: Có thể kiểm tra phiên bản MariaDB tại đây: http://yum.mariadb.org/
2.2. Cài đặt MariaDB
Để cài đặt MariaDB các bạn chạy lệnh sau
yum install MariaDB-server MariaDB-client -y
2.3. Đặt mật khẩu root
Sau khi cài đặt MariaDB các bạn tiến hành đặt mật khẩu root bằng cách chạy 2 lệnh sau
systemctl enable mariadb
systemctl start mariadb
mysql_secure_installation
Enter current password for root (enter for none): Nhấn phím Enter
Switch to unix_socket authentication [Y/n]: n
Change the root password? [Y/n]: Y
New password: Nhập password root các bạn muốn tạo
Re-enter new password: Nhập lại password root
Remove anonymous users? [Y/n] : Y
Disallow root login remotely? [Y/n]: Y
Remove test database and access to it? [Y/n] : Y
Reload privilege tables now? [Y/n]: Y
3. Bước 3: Cài đặt PHP-FPM và các Module cần thiết
3.1. Cài đặt PHP-FPM
Để cài đặt PHP-FPM các bạn chạy các lệnh sau
yum -y install yum-utils
rpm -Uvh http://rpms.remirepo.net/enterprise/remi-release-7.rpm
yum -y update

yum-config-manager --enable remi-php73
yum -y install php php-fpm php-ldap php-zip php-embedded php-cli php-mysql php-common php-gd php-xml php-mbstring php-mcrypt php-pdo php-soap php-json php-simplexml php-process php-curl php-bcmath php-snmp php-pspell php-gmp php-intl php-imap perl-LWP-Protocol-https php-pear-Net-SMTP php-enchant php-pear php-devel php-zlib php-xmlrpc php-tidy php-mysqlnd php-opcache php-cli php-pecl-zip unzip gcc
3.2. Cấu hình php cơ bản
Tất cả cấu hình php cần thiết sẽ nằm trong file /etc/php.ini. Một số thông số cơ bản bạn có thể sửa như sau
;date.timezone =
expose_php = On
short_open_tag = Off
;max_input_vars = 1000
disable_functions =
Các bạn sửa lại thành như sau:
date.timezone = Asia/Ho_Chi_Minh
expose_php = Off
short_open_tag = On
max_input_vars = 3000
disable_functions = exec,system,passthru,shell_exec,proc_close,proc_open,dl,popen,show_source,posix_kill,posix_mkfifo,posix_getpwuid,posix_setpgid,posix_setsid,posix_setuid,posix_setgid,posix_seteuid,posix_setegid,posix_uname
3.3. Cấu hình chạy PHP-FPM
Các bạn mở file /etc/httpd/conf.d/php.conf tìm dòng SetHandler application/x-httpd-php sửa thành SetHandler “proxy:fcgi://127.0.0.1:9000”

Tiếp theo khởi động lại apache để load lại config
systemctl restart httpd
3.4. Khởi động PHP-FPM
Sau khi hoàn tất cấu hình các bạn chạy 2 lệnh sau để khởi động PHP-FPM
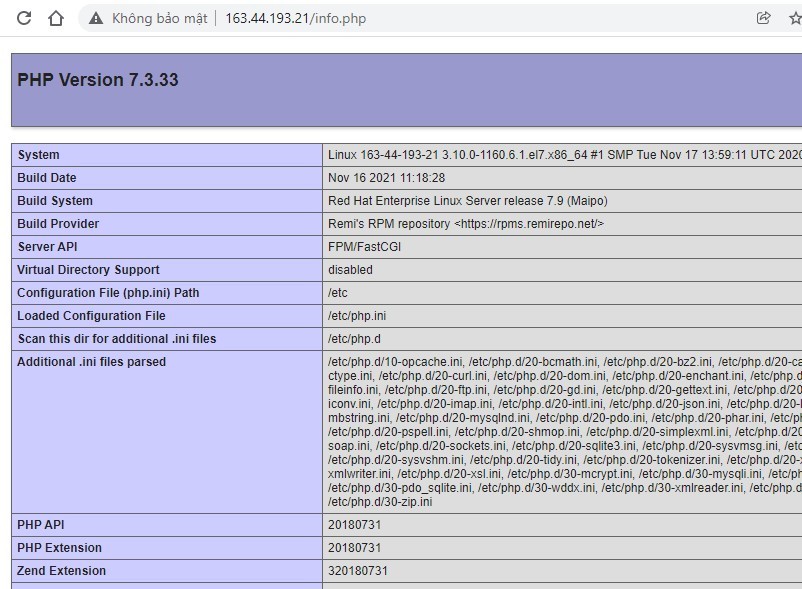
3.5. Kiểm tra
Để kiểm tra xem PHP-FPM đã hoạt động hay chưa các bạn tạo file /home/hostvn.net/public_html/info.php với nội dung sau
<?php
phpinfo();
Tiếp theo truy cập file info.php trên trình duyệt để kiểm tra
4. Bước 4: Cài đặt PhpMyAdmin
phpMyAdmin là một công cụ nguồn mở miễn phí được viết bằng PHP để quản trị MySQL thông qua trình duyệt web. Nó có thể thực hiện nhiều tác vụ như tạo, sửa đổi hoặc xóa bỏ cơ sở dữ liệu, bảng, các trường hoặc bản ghi; thực hiện báo cáo SQL; hoặc quản lý người dùng và cấp phép truy cập database.
4.1. Cài đặt PhpMyAdmin
Để cài đặt PhpMyAdmin các bạn chạy lần lượt các lệnh sau
cd /usr/share
wget https://files.phpmyadmin.net/phpMyAdmin/5.0.2/phpMyAdmin-5.0.2-all-languages.zip
unzip phpMyAdmin-5.0.2-all-languages.zip
mv phpMyAdmin-5.0.2-all-languages phpMyAdmin
rm -rf phpMyAdmin-5.0.2-all-languages.zip
rm -rf /usr/share/phpMyAdmin/setup
- Lưu ý: Truy cập phpmyadmin.net để lấy link down phiên bản mới nhất
4.2. Cấu hình PhpMyAdmin
File cấu hình của PhpMyadmin là file config.inc.php. Trước tiên các bạn cần chạy lệnh sau
mv /usr/share/phpMyAdmin/config.sample.inc.php /usr/share/phpMyAdmin/config.inc.php
Tiếp theo mở file /usr/share/phpMyAdmin/config.inc.php và chỉnh sửa các thông số sau
– Tìm
$cfg['blowfish_secret'] = '';
thêm một đoạn ký tự bất kỳ vào giữa cặp nháy đơn. Ví dụ:
$cfg['blowfish_secret'] = 'dsa123e12rwDSADs1few12tr3ewg3s2df3sAD';
– Tiếp theo thêm vào cuối file doạn code sau
$cfg['TempDir'] = '/usr/share/phpMyAdmin/tmp/';
Sau đó các bạn cần tạo thư mục tmp cho PhpMyAdmin
mkdir -p /usr/share/phpMyAdmin/tmp
chown -R apache:apache /usr/share/phpMyAdmin/tmp
4.3. Cấu hình vhost cho PhpMyAdmin
Để có thể truy cập được PhpMyAdmin các bạn sẽ cần tại vhost cho nó. Tạo file /etc/httpd/conf.d/phpmyadmin.conf với nội dung sau
Alias /pma /usr/share/phpMyAdmin
Alias /phpmyadmin /usr/share/phpMyAdmin

<Directory /usr/share/phpMyAdmin/>
    AddDefaultCharset UTF-8
    <IfModule mod_authz_core.c>
    # Apache 2.4
    <RequireAny>
        <RequireAll>
            Require all granted
        </RequireAll>
    </RequireAny>
    </IfModule>
    <IfModule !mod_authz_core.c>
        # Apache 2.2
        Order Deny,Allow
        Deny from All
        Allow from All
        Allow from ::1
    </IfModule>
</Directory>
<Directory /usr/share/phpMyAdmin/log/>
    Order Deny,Allow
    Deny from All
    Allow from None
</Directory>
<Directory /usr/share/phpMyAdmin/libraries/>
    Order Deny,Allow
    Deny from All
    Allow from None
</Directory>
<Directory /usr/share/phpMyAdmin/templates/>
    Order Deny,Allow
    Deny from All
    Allow from None
</Directory>
<Directory /usr/share/phpMyAdmin/tmp/>
    Order Deny,Allow
    Deny from All
    Allow from None
</Directory>
Khởi động lại apache để load cấu hình
systemctl restart httpd
Kết luận
Qua bài viết này TENTEN đã hướng dẫn các bạn cách cài đặt LEMP trên CentOS 7. Nếu có bất kỳ ý kiến đóng góp nào các bạn có thể gửi mail về kythuat@tenten.vn.
DỊCH VỤ CLOUD SERVER TỐC ĐỘ XỬ LÝ VƯỢT TRỘI